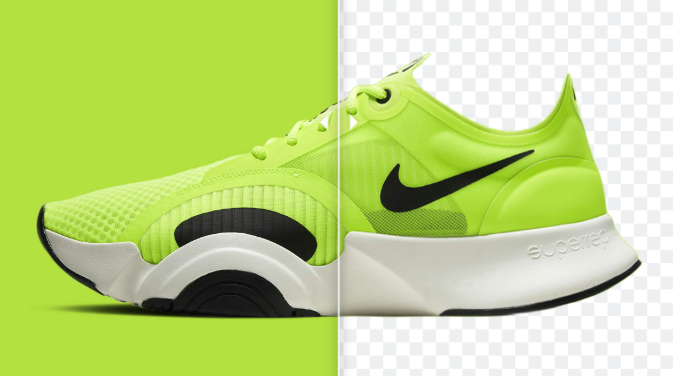

Upload your JPG, JPEG, PNG or WebP image to PxBee, let the tool isolate the subject, inspect the edges and download the result as a PNG so the transparent area is preserved.
A transparent background removes the visible area surrounding a subject. Instead of a white, black, or photographic backdrop, the image contains invisible pixels around the person, product, logo, signature, animal, or object.
This lets you place the subject over:
Website sections
Product designs
Presentations
Store graphics
Social posts
Business cards
Thumbnails
Posters
Custom backgrounds
Branded colors
PxBee can automatically remove the background and create a transparent cutout without requiring users to trace the subject manually.
CTA: Make My Background Transparent
[Place the live tool or a prominent tool preview here]
What Is a Transparent Background?
A transparent image does not have visible background pixels around its subject. The transparent area allows content behind the image to show through.
Inside an image editor, transparency is often represented by a gray-and-white checkerboard.
The checkerboard is only an interface convention. It should not be part of the actual downloaded image.
Transparent Background vs White Background
These two outputs may look similar on a white webpage, but they behave differently.
| Transparent background | White background |
|---|---|
| Invisible pixels surround the subject | White pixels surround the subject |
| Can be placed over other colors | Retains a visible white box |
| Commonly exported as PNG | Can be PNG or JPEG |
| Useful for logos and overlays | Useful for simple product presentation |
| More flexible for design reuse | Suitable when white is the required final background |
To check the difference, place the image over a blue, black, or colored background. A transparent image will show the new color around the subject. A white-background image will keep its white rectangle.
How to Make a Background Transparent Online
Step 1: Open PxBee’s Transparent Background Maker
Go to the Transparent Background Maker.
The current tool accepts:
JPG
JPEG
PNG
WebP
Step 2: Upload your image
Choose the largest original file available.
For a cleaner result, use an image where:
The subject is clearly visible.
Important edges are in focus.
The subject contrasts with the background.
The photo is not heavily compressed.
The subject is not covered by another object.
Lighting defines the subject boundary.
Step 3: Let PxBee remove the background
PxBee analyzes the image and separates the likely foreground subject from the surrounding area.
The removed area becomes transparent rather than being filled with white or another color.
Step 4: Inspect the edges
Zoom in before downloading.
Hair and fur
Look for missing strands, hard edges, or leftover background color.
Hands and fingers
Check the spaces between fingers and around small details.
Product openings
Review handles, straps, chair legs, jewelry, chains, and other interior spaces.
Glass and transparency
Partially transparent objects may retain some of the old background or become too opaque.
Shadows
Decide whether to preserve a contact shadow. A subject without any shadow can appear to float when placed on another background.
Step 5: Download as PNG
Download the finished cutout as PNG to preserve the transparent pixels.
Do not save it as JPEG if the transparency must remain.
CTA: Make a Transparent PNG
How to Make a Background Transparent on iPhone
There are two useful approaches.
Method 1: Use PxBee in Safari
Open Safari on your iPhone.
Visit the [PxBee Transparent Background
Maker](https://chatgpt.com/background-remover/transparent/).
Tap Upload Image.
Choose the image from Photos or Files.
Let PxBee remove the background.
Inspect the cutout.
Download the PNG.
Save the file to Photos or Files, depending on the available browser
options.
Test the image over a colored background.
This method is useful when you want a downloadable transparent file and access to PxBee’s related background tools.
Method 2: Lift the subject in Apple Photos
Apple’s supported iPhone workflow can isolate the subject from a photo or paused video frame:
Open the image in Photos.
Touch and hold the subject.
Wait for the subject outline to appear.
Choose Copy or Share.
Paste or share the subject into a compatible application.
Apple describes this feature in its iPhone user guide.
This method is convenient for messages, stickers, notes, and compatible design applications. Confirm the exported file format when you need a reusable transparent PNG.
How to Tell if an Image Is Really Transparent
Place it over a colored background
This is the most reliable visual check. A transparent area will show the new background through it.
Look for a checkerboard in an editor
Most editors use a checkerboard to represent invisible pixels.
Check the file type
PNG and WebP can support transparency. JPEG cannot.
A PNG file is not automatically transparent—it must actually contain transparent pixels.
Inspect the image corners
If the corners remain white, black, or checkerboard-patterned after placement over another color, the background may be baked into the image.
Avoid fake transparent images
Some images found online contain a visible checkerboard as part of the picture. They are not truly transparent.
How to Make Different Images Transparent
Product photos
A transparent product cutout can be reused across store graphics, catalogs, ads, and branded backgrounds.
Check:
Product edges
Handles and openings
Transparent packaging
Reflective surfaces
Real labels
Natural shadows
Accurate color
Do not use transparency editing to change or hide real product features.
Logos
Use the Logo Background Remover to create a transparent raster logo.
For professional brand work:
Keep the original vector master.
Preserve approved colors.
Check interior letter spaces.
Avoid cutting away white logo elements.
Export sufficient resolution for the intended use.
Signatures
Use the Signature Background Remover for a signature you own or have permission to process.
Confirm that:
Every intended pen stroke remains.
Paper texture is removed.
The signature color is preserved.
The output is stored securely.
It is never used to authorize something without permission.
Portraits
A transparent portrait can be placed over a clean background, presentation, profile design, or marketing graphic.
Pay particular attention to:
Hair
Earrings
Glasses
Clothing edges
Fingers
Shoulder boundaries
Semi-transparent fabric
Pets and animals
Fur, whiskers, feathers, and tails can be difficult to isolate. Use a clear, high-resolution source with good contrast.
Graphics and illustrations
Flat graphics can produce clean results, but white or black elements may be confused with the original background.
How to Remove a White Background
A white background is common in logos, scanned graphics, product photos, and screenshots.
Use the White Background Remover.
Before downloading, check whether the subject contains:
White clothing
White text
Pale highlights
Product labels
Reflections
White interior spaces
These details should remain part of the subject.
How to Remove a Black Background
Use the Black Background Remover when a subject is surrounded by black.
Check dark:
Hair
Clothing
Tires
Product edges
Shadows
Outlines
Text
Internal details
Dark subject pixels should not disappear with the background.
How to Create a Transparent PNG
A transparent PNG combines:
Visible subject pixels;
Fully invisible background pixels; and
Partially transparent edge pixels.
To create one:
Upload the source image.
Remove the background.
Check the edge quality.
Keep the background transparent.
Select PNG as the output format.
Download the file.
Test it over both light and dark colors.
Use the dedicated PNG Maker for a focused workflow.
PNG, JPEG, or WebP?
| Format | Supports transparency? | Best use |
|---|---|---|
| PNG | Yes | Logos, cutouts, signatures, design assets |
| JPEG/JPG | No | Photos with a solid or photographic background |
| WebP | Yes | Optimized web images when the destination supports WebP |
| SVG | Yes | Scalable vector logos and illustrations |
PxBee currently lists JPG, JPEG, PNG, and WebP as upload formats. Confirm the actual download choices in the production editor.
The current tool page says users can download a “transparent” image as PNG or JPG. That language should be corrected because JPEG does not preserve transparency.
Common Transparent-Background Problems
My image has a white background after download
Possible causes:
The image was exported as JPEG.
A messaging app converted the file.
The viewer displays transparency as white.
A white background was applied before download.
Try downloading the result again as PNG and opening it over another color.
The checkerboard appears in the downloaded image
The checkerboard may have been part of the source image rather than an editor transparency grid.
Upload the original image and remove the background again.
The image has a white outline
This color fringe may come from semi-transparent edge pixels mixed with the original white background.
Test the cutout over several colors. Professional edge refinement may be needed for production-critical work.
Part of the subject is transparent
The background may be visually similar to the subject. Use a clearer source or restore the missing area if editing controls are available.
Some background remains
Inspect fine gaps, shadows, transparent objects, hair, and internal openings. A more detailed manual mask may be necessary.
The PNG becomes blurry
The source or exported file may be too small for the new placement. Avoid enlarging it far beyond its original pixel dimensions.
The image looks like it is floating
Preserve or recreate a subtle contact shadow when placing products or people into another scene.
What Can You Do With a Transparent Image?
Add a white background
Use a clean white background for catalogs or designs that require it. See the White Background Remover for the focused workflow.
Add a custom color
Choose a brand color, neutral tone, or high-contrast shade.
Replace the background
Use the Background Changer to place the cutout into another photo.
Generate a new scene
Use the AI Background Generator to create a new background from a written description.
Review generated backgrounds for:
Perspective
Lighting direction
Scale
Shadows
Reflections
Product accuracy
Factual or commercial misrepresentation
Final Transparent-Image Checklist
Before using the file, confirm:
The background is truly transparent.
The file is PNG or another transparency-supporting format.
The entire subject remains visible.
No unwanted background pixels remain.
Hair and fur edges look acceptable.
Internal openings are transparent.
White or black subject details were preserved.
The image was tested over light and dark colors.
Product, logo, or signature details remain accurate.
You have permission to edit and use the source image.
Make Your Background Transparent With PxBee
Upload an image, let PxBee isolate the main subject, review the edges, and download a transparent PNG for your next design.
Primary CTA: Make My Background Transparent Free